Demo: Apigee Edge OAuth2 Debugging

This post was originally published as “Demo: Apigee Edge OAuth2 Debugging” on the Apigee Blog.
As we’ve described in previous posts, OAuth2 and OpenID Connect (OIDC) have emerged as the de facto standard for securing APIs (for authentication and authorization). Apigee Edge provides an out-of-the-box OAuth2 implementation. It is a common pattern to “wrap” a third-party Identity Provider with the Apigee OAuth2 functionality. To phrase it more formally, Apigee Edge can act as an OAuth2 Provider while an external IdP is required to provide end user authentication services. In this post, In this post, we will explore assumptions and requirements for a real world application.
We are going to introduce two Apigee API Proxies; one that implements our OAuth2 Provider as a wrapper around a third-party Identity Provider (IdP) using the OIDC spec and one that protects an API with OAuth2 security. Then, we are going to use my OAuth2 + OIDC Debugger to demonstrate the Authorization Code Grant and Refresh Token call.
To keep the size of this post at a reasonable length, I’ve put most of the technical details into Github repositories and supporting blog posts including:
- OAuth2-Protected API Proxy protecting an API
- OAuth2 Provider API Proxy
- OAuth2 + OIDC Debugger
- Configure and run the Apigee Edge OAuth2 Example
The entry point for setting up a working example is the fourth link — Configure and run the Apigee Edge OAuth2 Example. While not specific to Apigee, I added Refresh Token support to the OAuth2 + OIDC Debugger while putting together this blog post.
If you want to get on to those technical details, go ahead and look at the steps outlined in the forth link.
Apigee Edge provides the building blocks of an OAuth2 Authorization Server that are meant to be assembled by the skilled practitioner in whatever configuration is needed for the given use case. While flexible, this gives one a lot of rope with which to hang themselves; as always, any real world applications of this technology should adhere to the relevant specifications and undergo proper penetration testing.
While I’ve already built some non-spec defined features into the debugger to deal with implementation details of other OAuth2 (and OIDC) implementations, all of the implementations closely followed the specs including:
- User-Agent (browser) interacts with the authorization endpoint as defined in the specification including all required parameters (and some optional parameters, maybe some proprietary parameters).
- Application (Client) interacts with the token endpoint as defined in the specification including all required parameters (and some optional parameters, again, maybe some proprietary parameters).
- The login sequence is initiated by the User-Agent by making the call to the authorization endpoint. This endpoint either does a redirect to a separate authentication workflow endpoint or returns a login form. The exact details of how this works are beyond the scope of the specification.
- There is some type of trust relationship established between the authorization endpoint and authentication workflow endpoint — typically implemented with a security session tracking cookie.
- For the OAuth2 Authorization Code Grant, OAuth2 Implicit Grant, and all OIDC Authentication flows, the IdP serves the authentication workflow.
The Apigee OAuth2 examples that involve end-user authentication generally involve Apigee Edge acting as an OAuth2 Provider and a third-party Identity Provider handling the end user authentication. There are several ways of integrating these two concepts. We can’t cover them all here. We have this one that is Apigee’s official example of the Authorization Code Grant. It is discussed in further detail here. This example has the (server-side) Client application making an initial request going to the third-party identity provider (simulated by an Apigee API Proxy). It is similar to the OAuth2 protocol, but isn’t spec-compliant.
So, I looked around for another OAuth2 Authorization Code Grant example from Apigee that looked a bit more like what I was used to seeing. I found this example that has the same high-level pattern (only OIDC Authorization Code Flow) with Apigee as the OAuth2 Provider and a third-party IdP (Ping Federate) as the Identity Provider. This OIDC example wraps the third-party Identity Provider response in an Apigee-issued OAuth2 access token that is returned to the calling client application. It accomplishes this by mimicking (impersonating) the original client application at the API Proxy (Apigee Edge layer) during its interaction with the third-party IdP.
This implementation has the initial spec-defined OAuth2 Authorization Code Grant call to the authorization endpoint, but the registered endpoint in the third-party IdP is the Apigee API Proxy. The end result of this is that the client application doesn’t actually make the call to the token endpoint. One could imagine how someone would view this as beneficial and easier from the perspective of the client application developer.
Actually, what this example is doing is similar to one of OIDC Hybrid Flow variants (no interaction with the token endpoint from the client’s perspective), but that doesn’t match up with the response_type in use. So, this to isn’t meeting the OIDC and OAuth2 spec compliance we need in the example that we are going to use.
So, I created my own implementation that used the following design principles:
- A third-party IdP is responsible for authenticating the end user and applications. In our example, Red Hat SSO v7.1 is acting as the Identity Provider that is responsible for a) authenticating end users and b) the applications.
- All clients send OAuth2 requests to an API Proxy that wraps interaction with the third-party IdP.
- The third-party IdP has no concept of who the API Gateway (or proxy) that is acting as an intermediary. The most secure implementation of this pattern would be to include the third-party Identity Provider having a clear understanding of API Gateway and the Applications. However, modeling the delegation rules between these actors is far more complex than pretending like the API Gateway doesn’t exist in the IdP. So, for now, we’re not going to worry about that detail.
- The authorization endpoint on Apigee returns a redirect to the third-party IdP authorization endpoint (using the same query parameters). This doesn’t explicitly hide the third-party IdP from the client application, which would likely be preferable in most situations — let’s call this the author taking a shortcut that could be easily resolved if properly motivated.
- The authorization codes, refresh tokens, and access tokens issued to the client applications are generated by Apigee Edge, but issued after validating user and application credentials against the third-party IdP.
- The OpenID Connect protocol is used to integrate with Red Hat SSO for Authorization Code Grant. This gives us access to the UserInfo endpoint to retrieve information about the user.
- The OAuth2 protocol is used to integrate with Red Hat SSO for the Client Credentials grant.
- The cached refresh token on Apigee is only held for eight hours. After this, the user would have to start a new session by logging in again.
- There are numerous other timeout considerations across access tokens, refresh tokens, and sessions on the IdP that should be considered for real-world usage. That’s beyond the scope of this post (and the given example).
We also have the following additional assumption:
- The Authorization Code Grant and Client Credentials Grant have been implemented in Apigee for the purposes of this example. The other OAuth2 grants can be implemented easily enough using the building blocks from these two.
Given all of that, we arrive at this API Proxy (available on GitHub) that wraps a third-party, OIDC-compliant Identity Provider. There is a pre-built API Proxy bundle available here if you want to get started very quickly.
Likewise, I created this API Proxy that will protect a backend API using Apigee’s out-of-the-box OAuth2 access token validation.
The details of how to build, deploy, and test these proxies can be found here.
The basic interaction between the actors looks like the following.
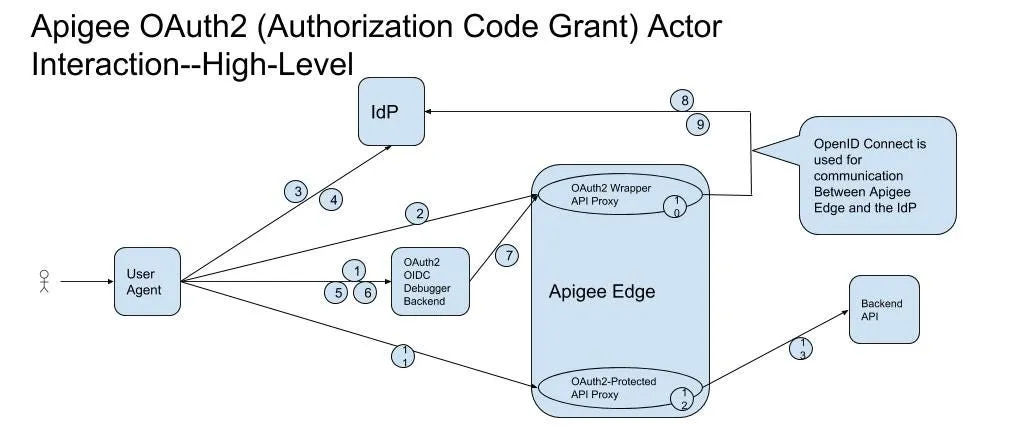
Apigee OAuth2 (Authorization Code Grant Actor Interaction — High-Level
The steps are:
- Load OAuth2 + OIDC Debugger UI.
- Send request to Apigee OAuth2 Authorization Endpoint (advertised by the OAuth2 Wrapper API Proxy) to kick off Authorization Code Grant.
- User is redirected to third-party IdP OAuth2 Authorization Endpoint.
- User authenticates against IdP (involves interaction with IdP login workflow).
- Authorization code is returned via redirect to Redirect URI; results in authorization code being available to debugger UI.
- The debugger UI makes a call to its backend with the token endpoint parameters that must be given to the Apigee OAuth2 Token Endpoint.
- The debugger backend sends a request to the Apigee OAuth2 Token Endpoint (advertised by the OAuth2 Wrapper API Proxy)
- The API Proxy makes a call to the IdP OAuth2 Token Endpoint to validate the authorization code and obtain an IdP-issued access token and refresh token.
- The API Proxy makes a call to the IdP OIDC Token Endpoint to obtain user profile information for the authenticated user.
- The API Proxy caches the IdP-issued refresh token for later lookup and generates an Apigee-issued access token and refresh token. These tokens are returned to the debugger backend and then to the debugger UI.
- Using Swagger UI (or something similar) and the access token that was just obtained, an API call can be made to an API Proxy that is protecting the backend API with OAuth2.
- The OAuth2-Protected API Proxy extracts and validates the access token (using out-of-the-box functionality).
- The API Proxy removes the access token from the request and forwards the request to backend API. In the real world, there would be some type of trust relationship established between the API Gateway and the backend API (Mutual Auth SSL, shared key, username + password, or similar).
The detailed interaction between these actors is described here.
Testing the Authorization Code Grant is shown at the end of the Apigee OAuth2 Configuration post.
Using the Refresh Token with the debugger is described in this post.
There are many ways Apigee’s OAuth2 implementation can be used. This is one example, but I encourage you to follow the design principles that have been laid out here. Ordinarily, the level of detail described here can be abstracted away from application developers by authentication libraries. An Apigee Developer that is implementing a similar pattern will need to know these details.
Image: Debugging / Brad Hagan
Originally published on Medium.